最近在学习vue.js技术揭秘电子书, 做了一些笔记,对vue的理解又更深了一个层次
准备工作
类型检查flow
类型检查是当前动态类型语言的发展趋势,在编译期间尽早发现(由错误类型)引起的bug,又不影响代码运行(不需要运行时动态检查类型),使得javascript具有和编写java等强类型语言具有相近的体验
通常类型检查有两种方式:
- 类型推断:通过变量的使用上下文来推断出变量类型,然后根据这些推断来检查类型
- 类型注释:事先注释好期待的类型,基于这些类型推断
源码目录设计
1234567src├── compiler # 编译相关├── core # 核心代码├── platforms # 不同平台的支持├── server # 服务端渲染├── sfc # .vue 文件解析├── shared # 共享代码
Runtime Only VS Runtime + Compiler
- Runtime Only
使用Runtime Only版本的vue.js,需要借助webpack的vue-loader等工具将.vue
文件编译成javascript,因为是在编译阶段做的,只包含运行时的vue.js,所以体积也会比较轻量 - Runtime + Complier
如果没有对代码进行预编译,又使用了Vue的template属性传入了一段字符串,则需要在客户端编译模板Vue的定义
123456789101112131415161718192021222324// src/core/instance/index.jsimport { initMixin } from './init'import { stateMixin } from './state'import { renderMixin } from './render'import { eventsMixin } from './events'import { lifecycleMixin } from './lifecycle'import { warn } from '../util/index'function Vue (options) {if (process.env.NODE_ENV !== 'production' &&!(this instanceof Vue)) {warn('Vue is a constructor and should be called with the `new` keyword')}this._init(options)}initMixin(Vue)stateMixin(Vue)eventsMixin(Vue)lifecycleMixin(Vue)renderMixin(Vue)export default Vue
它实际上是一个Function实现的类,只能通过new Vue去实例化。为何不用es6的class去实现类呢?上面代码看到很多xxxMixin函数的调用,并把Vue作为参数传入,功能是在Vue.prototype上扩展一些方法
,Vue按功能把这些扩展分散到多个模块去实现,这种方式用class难以实现,这样做的好处是方便代码的维护和管理。
initGlobalAPI
Vue在整个初始化过程,除了给它的原型prototype上扩展方法外,还会给Vue这个对象本身扩展全局静态方法
数据驱动
Vue的一个核心思想就是数据驱动,所谓数据驱动,是指视图是由数据驱动生成的,我们对视图的修改,不会直接操作dom,而是通过修改数据。
new Vue发生了什么
Vue的初始化主要做了几件事情,合并配置,初始化生命周期,初始化事件中心,初始化渲染,初始化data,prop,computed,watcher等
Vue实例挂载的实现
Vue中是通过$mount实例方法去挂载vm的,$mount的实现是跟平台,构建方式都相关的,以下是complier版本的$mount
在vue2.0中,所有组件的渲染,最终都是需要render方法,无论是单文件.vue
方式开发组件,还是写了el或template属性,最终都会转化为render方法。这个过程是一个“在线编译”的过程,调用compileToFunctions方法实现,最后调用原先原型上的$mount方法挂载。
render
Vue的_render方法是实例的一个私有方法,它用来把一个实例渲染成虚拟Node,render 函数的第一个参数是 createElement
相当于编写了如下render函数
Virtual DOM
virtual dom就是用一个原生的js对象去描述dom节点,比创建一个dom的代价要小很多。Vue.js 中 Virtual DOM 是借鉴了一个开源库 snabbdom 的实现,然后加入了一些 Vue.js 特色的东西。virtual dom除了它数据结构的定义,映射到真实dom实际要经历vnode的create,diff,patch过程。
createElement
createElement函数主要是通过对children进行扁平化处理之后,通过对标签(tag)的判断,使用VNode类来生成vnode,并将其返回
update
Vue的_update方法是实例的一个私有方法,调用时机有两个,一是首次渲染的时候,二是数据更新的时候。它的作用是把vnode渲染成真实的dom。
总结
初始化vue到最终渲染的整个过程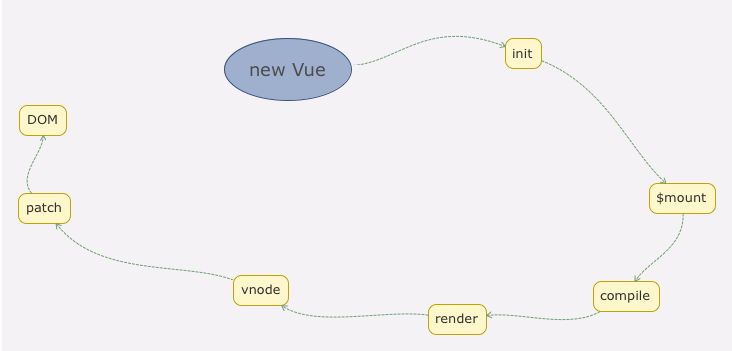
组件化
createComponent
createComponent有3个关键步骤:构造子类构造函数,安装组件钩子函数和实例化vnode
组件vnode patch
- patch的整体流程:createComponent -> 子组件初始化 -> 子组件render -> 子组件patch
- activeInstance为当前激活的vm实例,vm.$vnode为组件的占位vnode,vm._vnode为组件的渲染vnode
- 嵌套组件的插入顺序是先子后父
合并配置
new Vue的过程有两种场景,一是外部我们的代码主动调用new Vue(options)实例化一个vue对象,二是内部通过new Vue(options)实例化组件。这两种场景都会执行_init(options)的方法,它首先会执行一个merge options的逻辑生命周期
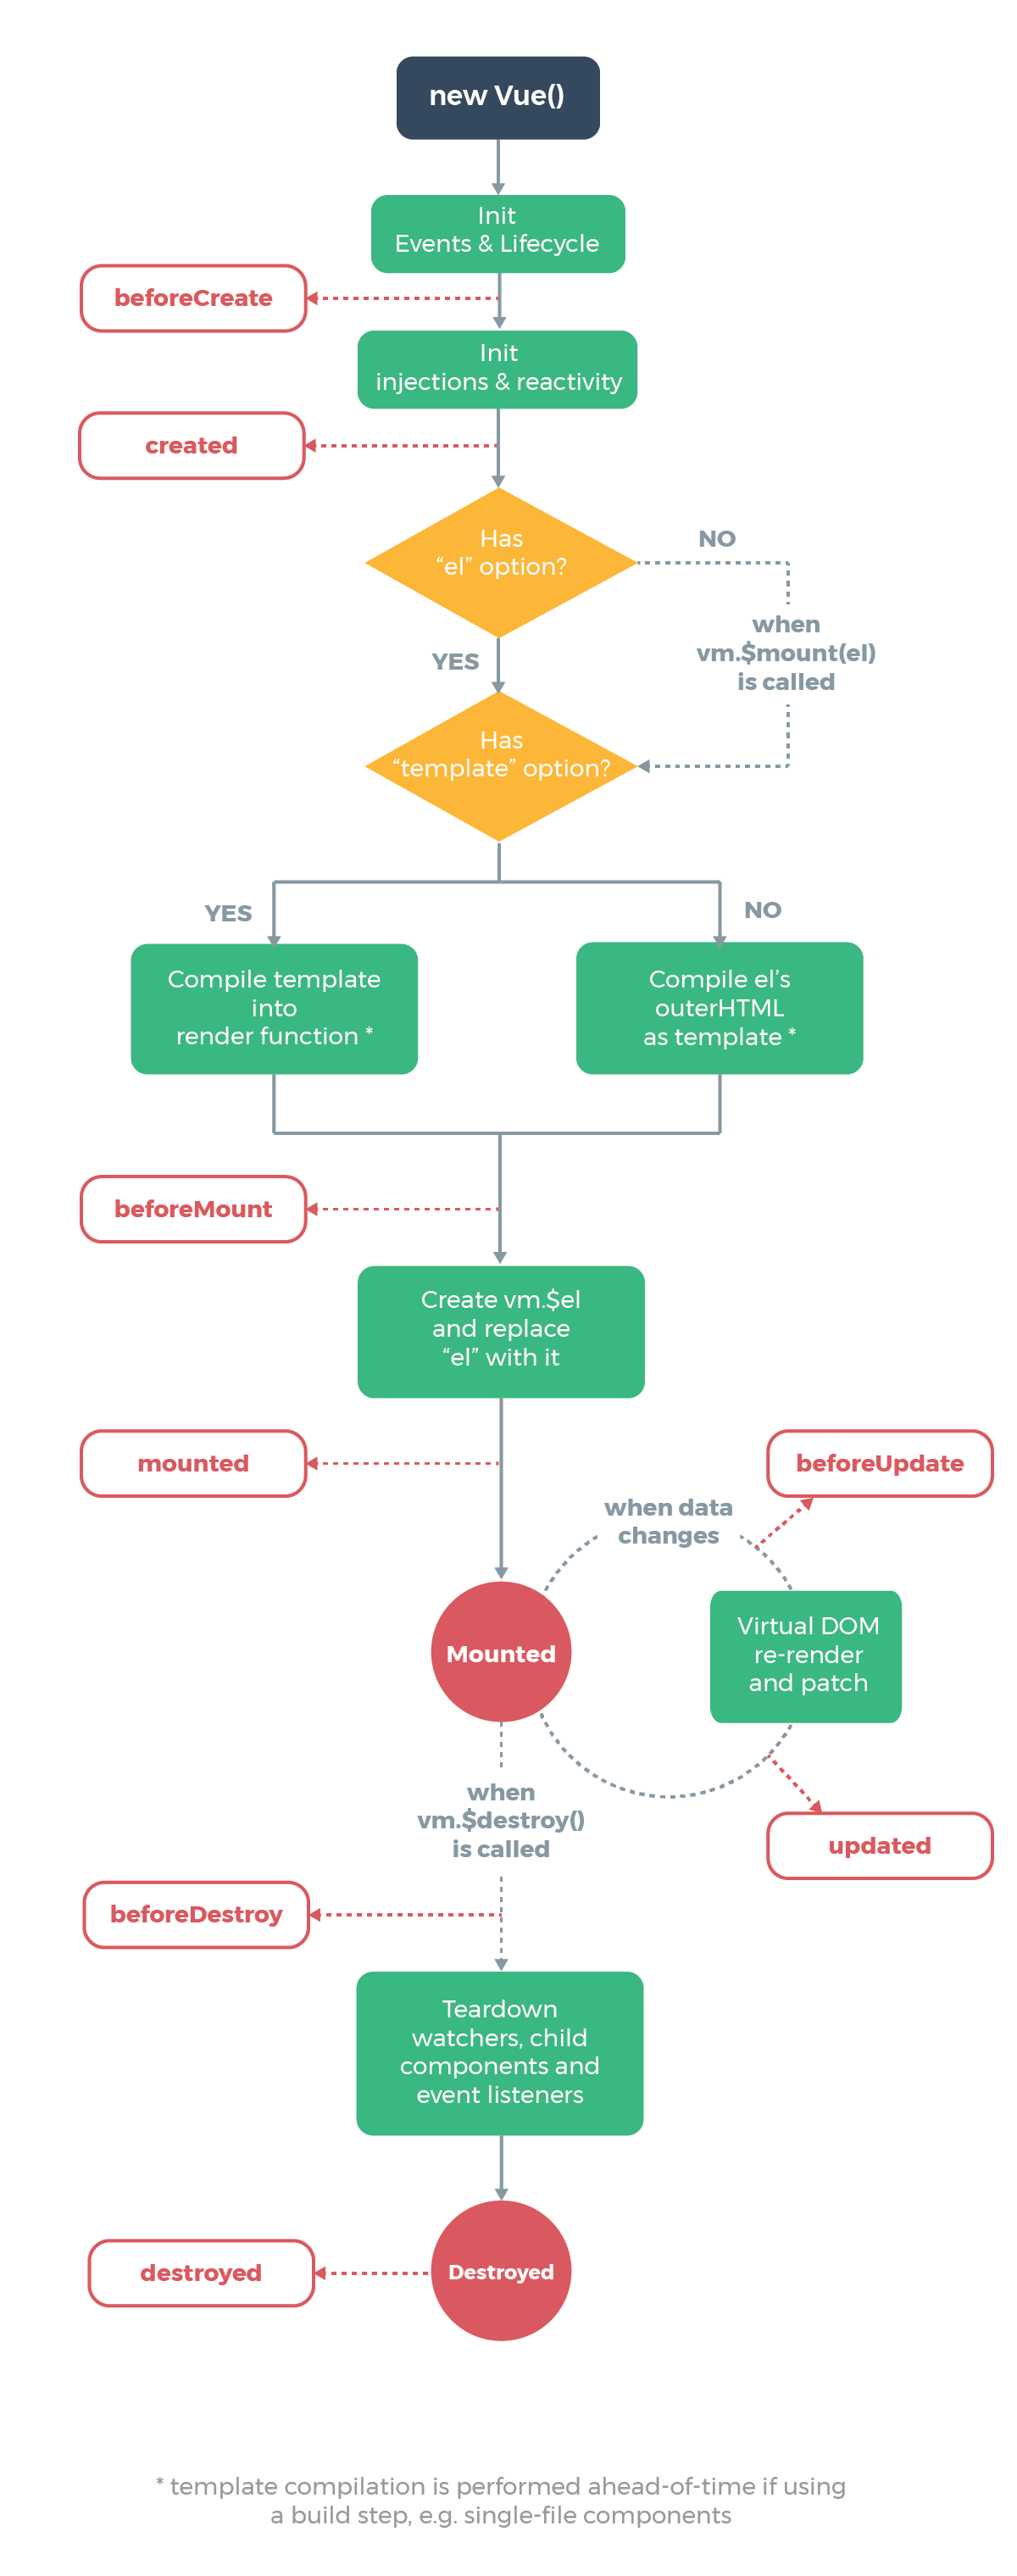
- beforeCreate & created
beforeCreate和created是在实例化Vue阶段,在_init方法中执行的。123456789101112Vue.prototype._init = function (options?: Object) {// ...initLifecycle(vm)initEvents(vm)initRender(vm)callHook(vm, 'beforeCreate')initInjections(vm) // resolve injections before data/propsinitState(vm)initProvide(vm) // resolve provide after data/propscallHook(vm, 'created')// ...}
beforeCreate和created的调用是在initState的前后,因此不能获取props,data中的值,也不能调用methods中定义的函数,dom还没渲染,也不能访问dom。
- beforeMount & mounted
深入响应式原理
响应式对象
- 响应式对象的核心是利用了Object.defineProperty给对象的属性添加getter和setter
- Vue会被props,data等变成响应式对象,在创建过程中,发现子属性也为对象则递归把该对象也变成响应式的
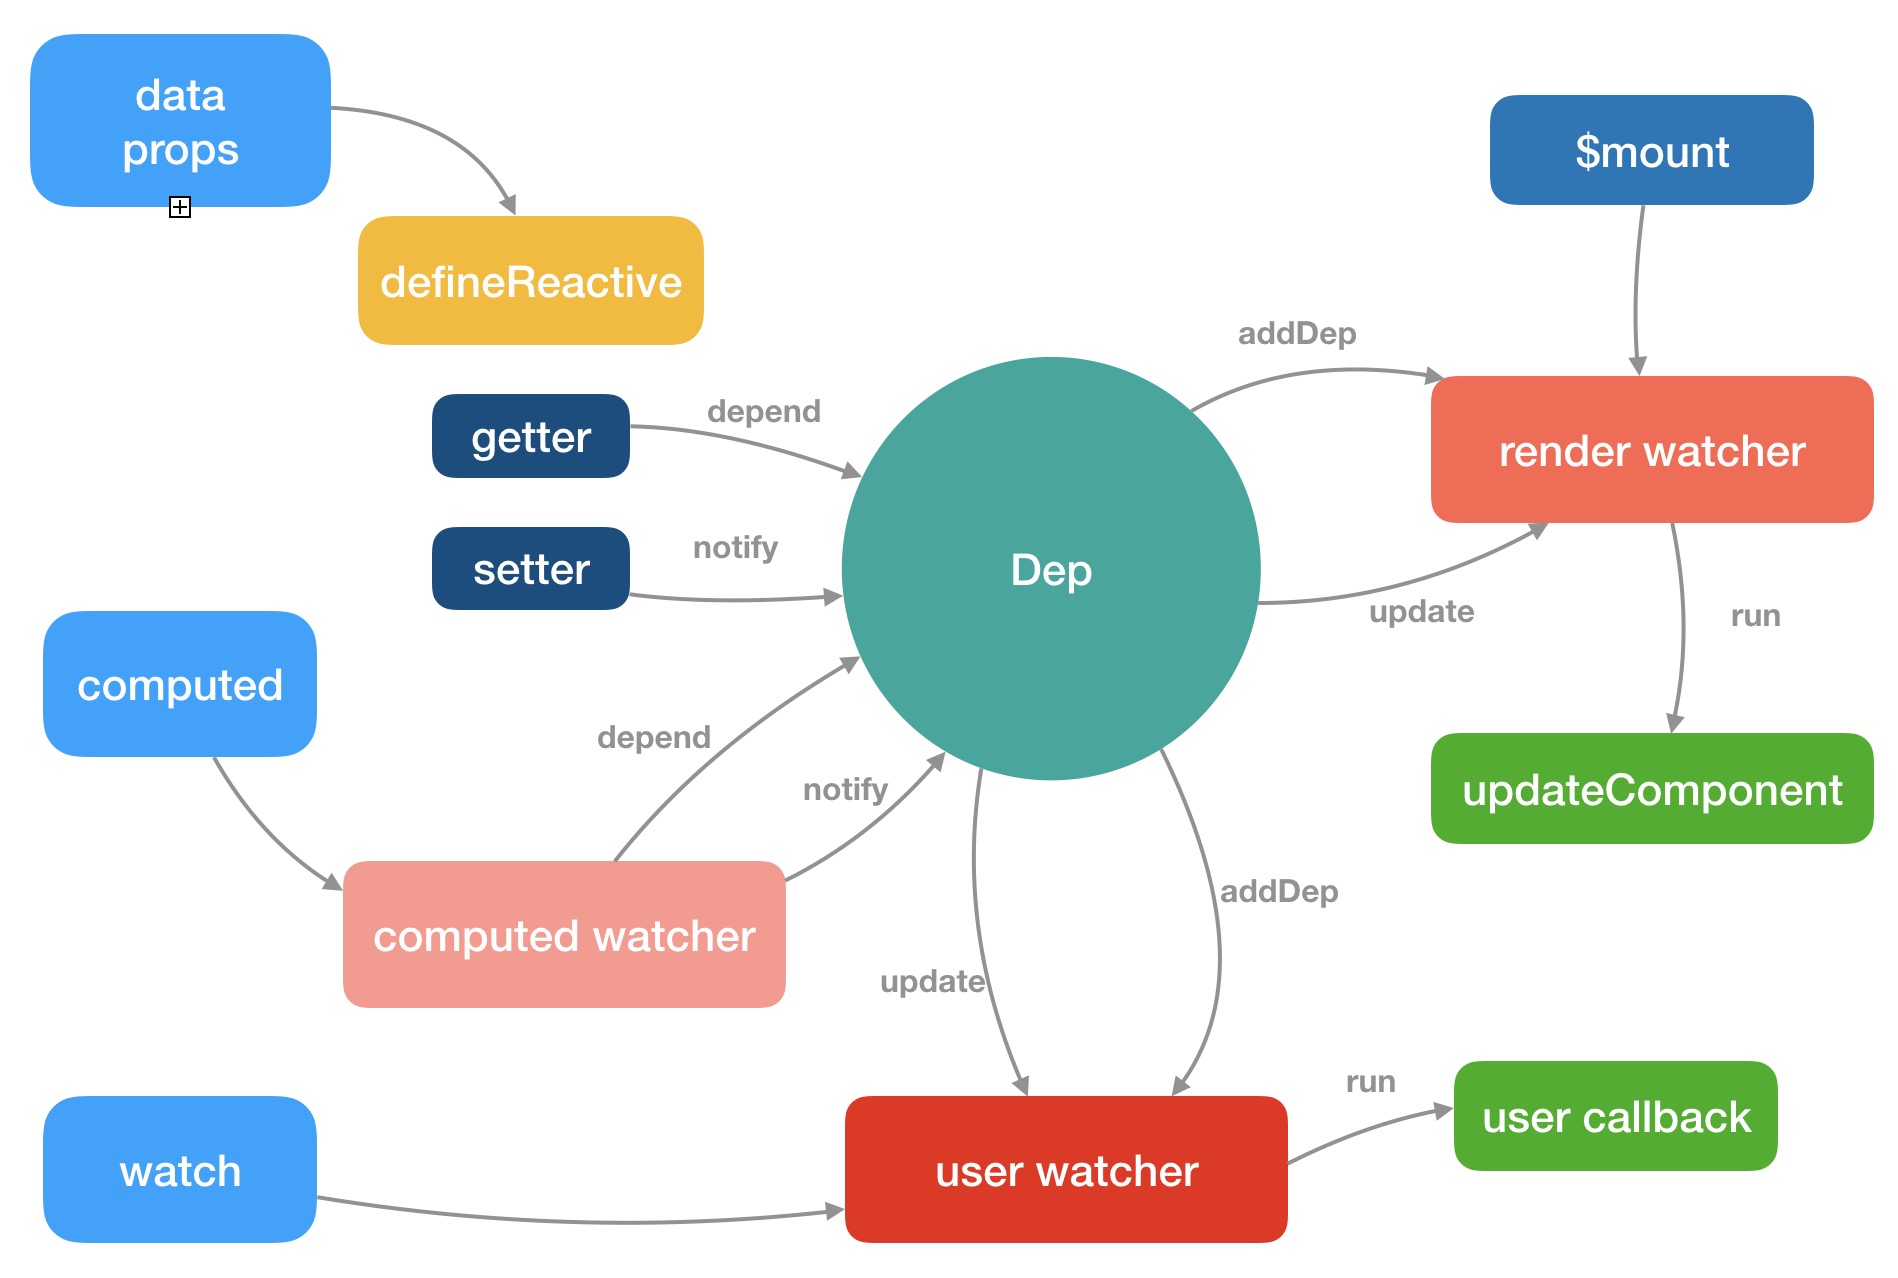
依赖收集
- 依赖收集就是订阅数据变化的watcher的收集
- 依赖收集的目的是为了当这些响应式数据发送变化,触发他们的setter的时候,能知道应该通知哪些订阅者去做相应的逻辑处理
派发更新
- 派发更新就是当数据发送变化之后,通知所有订阅了这些数据的watcher执行update
- 派发更新的过程会把所有要执行update方法的watcher推入到队列中,在nextTick后执行flush
nextTick
- nextTick是把要执行的任务推到一个队列中,在下一个tick中同步执行
- 数据改变后触发渲染watcher的update,但是watchers的flush是在nextTick后,所以重新渲染是异步的
检测变化的注意事项
- 响应式数据中对于对象的新增删除属性以及数组的下标访问修改和添加数据等的变化是观测不到
- 通过Vue.set以及数组的API可以解决这些问题,本质上它们内部都是手动去做了依赖更新的派发
计算属性vs侦听属性
- 计算属性的本质是computed watcher
- 侦听属性的本质是user watcher,它还支持deep,sync,immediate等配置
- 计算属性适用于模版渲染中,某个值是依赖了其他响应式对象甚至是计算属性计算而来的。而侦听属性适用于观测某个值的变化去完成一段比较复杂的业务逻辑
组件更新
- 组件更新的过程核心就是新旧vnode diff,对新旧节点相同和不同的情况分别做不同的处理
- 新旧节点不同的更新流程就是创建新节点->更新父占位符节点->删除旧节点
- 新旧节点相同的更新流程就是去获取它们的children,根据不同的情况做不同的更新逻辑
原理图
编译
- vue.js在不同平台下都会有编译过程,因此编译过程中依赖的配置baseOptions会有所不同
- vue.js利用了函数柯理化的技巧很好的实现了baseOptions参数的保留,同样,vuejs也是利用了函数柯理化技巧把baseCompiler函数抽离出来,把真正编译的过程和其他逻辑如对编译配置处理,缓存处理剥离开
扩展
event
- event在编译阶段生成相关的data,对于dom事件在patch过程中的创建阶段和更新阶段执行updateDomListeners生成dom事件。对于自定义事件,会在组件初始化的过程中,通过initEvents创建
- 原生dom事件和自定义事件的主要区别在于添加事件和删除事件的方式不同,并且自定义事件的事件派发是往当前实例上派发的,但是可以利用在父组件环境定义回调函数来实现父子组件通讯
v-model
- v-model本质是个语法糖,但也在运行时做了一些优化
- v-model既可以支持原生表单元素,也可以支持组件。在组件的实现中,我们是可以配置子组件接收的prop名称,以及派发的事件名称
slot
- 普通插槽:在父组件编译和渲染阶段生成vnode,所以数据的作用域是父组件实例,子组件渲染的时候时候直接拿到这些渲染好的vnodes
- 作用域插槽:父组件在编译和渲染阶段并不会直接生成vnodes,而是在父节点vnode的data中保留一个scopedSlots对象,存储着不同名称的插槽以及他们对应的渲染函数,只有在子组件渲染阶段才会执行这个渲染函数生成vnodes
keep-alive
- keep-alive是一个内置抽象组件,他的实现的是通过自定义render函数并利用了插槽
- kep-alive组件的渲染分为首次渲染和缓存渲染,当命中缓存的时候,不再执行created和mounted钩子函数,而会执行activated钩子函数,销毁时也不会执行destoryed钩子函数,而是执行deactivated钩子函数
transition-group
- transition-group是为了做列表的过渡,他会渲染成真是的元素
- 当我们去修改列表的数据的时候,如果是添加或者删除数据,则会触发相应原色本身的过渡动画,这点和
组件实现效果一样。除此之外,还实现了move的过渡效果,让我们的列表过渡效果更加丰富 vue-router
- vue编写插件的时候通常需要提供静态的install方法
- vue-router的install方法会给每一个组件注入beforeCreated方法和destoryed钩子函数,在beforeCreated做一些私有属性定义和路由初始化工作
- 路由初始化时机是在组件的初始化阶段,执行到beforeCreated钩子函数的时候会执行router.init方法,然后又会执行router.transitionTo做路由过渡
- createMatcher的初始化就是根据路由的配置描述创建映射表,包括路径,名称到路由record的映射关系
- match会根据传入的位置和路径计算出新的位置,并匹配到对应的路由record,然后根据新的位置和record创建新的路径并返回
- 路由始终会维护当前线路,路由切换的时候会把当前线路替换成目标线路,切换的过程中会执行一系列的导航守卫钩子函数,会更换url,同样也会渲染对应的组件,切换完毕后会把目标线路替换成当前线路,这样就会成为下一次路由切换的依据